information
Protected Node Password Form
Protected Node Password Form
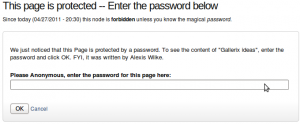
 Once a node is protected, users who cannot bypass the password are sent to the password form (see image on the side.)
The password form is very simple. It includes one field for users to enter the node password and an OK button.
When the browser of the user sent us a referrer, then the Protected node module adds a Cancel link back to that referrer. Using the global settings, you can force a Cancel link to always be there. When no referrer is available, the Cancel link will send your users to your home page.
The title, information, description and title over the
Protected Node Global Settings
The protected node module has global settings found under:
Administer » Site configuration » Protected node
Protected node Statistics
The page starts with statistics to let you know how pages are protected on your website. All the counts include published and unpublished content.
- Total nodes — the total number of nodes on your website
- Unprotected nodes — number of nodes that do not have a password
-
Protected nodes — number of nodes that are current protected by a password
- Showing title — number of nodes showing their ...
Protected Node Installation
The basics of the Protected Node installation are easy:
- Get one of the tarball from Drupal.org
- Extract the files under sites/all/modules or some other modules folder
- Go to Administer » Site building » Modules and install the module (package Access)
- As the administrator (UID = 1) you are done.
Once you have installed the module, you probably want to change the permissions. Permissions allow your users to access the Protected Node functionality based on their roles. Please, see the point about Permissions for more information about those.
Now, you're ready ...
Upgrade to Snap! Business

Your business website is you online. Educate your leads by the writing of your journal, and offer quality pages full of information!
This upgrade enhances your existing ![]() Snap! Blogger Free website with business quality features such as remote blogging, anti-spam features, incorporated social media capabilities, professional analysis, and much
Snap! Blogger Free website with business quality features such as remote blogging, anti-spam features, incorporated social media capabilities, professional analysis, and much
Table of Contents Settings
Filter Configuration
At this point, most of the Table of Contents configuration is done in the Table of Contents filter.
This means multiple Input formats allow you to make use of several different configurations.
Table of Contents Known Issues
Various known issues with the Table of Contents module.
Teaser appear, FCKeditor accentuated letters, Back to top arrow, Filters interaction (JavaScript removal,) headers numbering, double numbering...
To Do List API
To Do List offered Hooks
Since version 1.1, the To Do List module includes a few module_invoke() calls that other modules can catch via one of the following hooks.
To Do List Known Issues
Cannot Assign User to To Do List item
When you first install the module, I wouldn't be surprised if you'd want to create a To Do List item right away and then assign the task to one or more users.
It won't work.
Before users can be assigned a To Do List item, you must give them permission to be assigned to such an item. This is done in the usual permission place: Administer » User management » Permissions. You may also want to create a new role of people who deal with To Do List items.
Actually, the To Do List module comes with many permissions so you may want to ...
To Do Block
Installation
Go to Administer » Site building » Modules and click on To Do Block to install the Block extension for the To Do module.
Help for To Do List End Users
Introduction
![]() This page documents the usage of the To Do List module to end users (i.e. not how to install and setup the module, but how to create To Do List items, share them, mark them started/finished, etc.)
This page documents the usage of the To Do List module to end users (i.e. not how to install and setup the module, but how to create To Do List items, share them, mark them started/finished, etc.)
For administrative information check out the To Do List module help.
