SWF Any Filter (swf_any_filter)
A filter defines how to transform the objects it is attached to. The first byte is the filter type. The data following depend on the type. Because each filter is much different, they are defined in separate structures. You can attach a filter to an object using an ActionScript or the PlaceObject3 tag.
The following describes the different filters available since version 8.
Value Name Version 0 Drop Shadow 8 1 Blur 8 2 Glow 8 3 Bevel 8 4 Gradient Glow 8 5 Convolution 8 6 Color Matrix 8 7 Gradient Bevel 8
Glow, Drop Shadow, Bevel, Gradient Glow and Gradient Bevel
The following structure describes the Glow, Drop Shadow, Bevel, Gradient Glow and Gradient Bevel which all use the same algorithm. Those with less parameters can use a faster (optimized) version of the full version algorithm.
These filters are used to generate what looks like a glow or a shadow. It uses the alpha channel of the object being filtered. Only the alpha is used in the computation of the shape until the end when the color is applied. The result is then composited with the object (unless f_knock_out is set to 1 in which case it replaces the object) before being drawn in the display.
The f_count is assumed to be 1 unless a gradient filter is used, in which case a byte will be defined here. Note: the maximum number of gradient is not specified in the Macromedia documentation. It can be assumed to be the same as for the other gradients and thus it either can be 1 to 8 or 1 to 15. I will need to test that too!
The f_rgba color is used as the final step to color the resulting shape. A standard shadow uses a black or dark gray color and a standard glow has a color between the general color of the object being filtered and white.
The f_hightlight_rgba color is used by the Bevel filter to color the second half of the final shape (f_rgba colors the first half). This is usually set to a glow color whereas the f_rgba is set to a shadow color.
The f_position is used as the position of that specific gradient entry. This is similar to the f_position parameter of the swf_gradient_record.
The f_blur_horizontal and f_blur_vertical values are used to blur the edges horizontally and vertically. See the Blur filter for more information about the blur effect.
The f_radian_angle and f_distance are used to move the shadow away from the object being placed. Notice that the angle is in radian. Increasing the angle turns the effect clockwise. An angle of 0.0 points to the right side of the object.
The f_strengh value is used to multiply the resulting grey scale. Smaller values make the shadow darker. 1.0 keeps the alpha channel as it is (beside the blur).
The f_inner_shadow flag means that the result is applied inside the parent object and not arround as you would expected for a shadow. If you need both: an inner and an outer shadow (necessary for semi-transparent objects) then you will need to setup two filters.
The f_knock_out flag means that the source object is not rendered in the result, only the shadow. This can be used (in general) to draw the edges of the object. It can also be used to apply a different transformation on the shadow than on the object (in which case the object will be twice in the display list: once to draw its shadow and once to draw itself.)
The f_composite_source must be set to 1 for the Drop Shadow.
The f_on_top flag indicates whether the resulting shadow and highlight should be rendered below (0) or over (1) the source image. This is at times referenced as Overlay.
The f_passes counter available with the gradient filters can be used to repeat the filter computations multiple times. This parameter should be set to 1, 2 or 3. A value of 0 is illegal and a larger value will not only slow down the computation time, it is likely to generate a bad result.
The Blur filter applies a seemingly complex mathematical equation to all the pixels in order to generate soft edges. To simplify: it adds the surrounding pixels to a center pixel and normalize the result. This generates the effect of a blurry image. Note that this blur is applied to squares (box filter).
The math in a C++ function goes like this:
	swf_rgba blur(const char *image, int x, int y, int blur_h, int blur_v)
	{
		/* we assume that blur_h/v are odd */
		int x1 = x - blur_h / 2;
		int x2 = x + blur_h / 2;
		int y1 = y - blur_v / 2;
		int y2 = y + blur_v / 2;
		swf_rgba blur;

		blur.reset();	/* set to all 0's */
		yp = y1;
		while(yp <= y2) {
			int xp = x1;
			while(xp <= x2) {
				blur += image(xp, yp);
				++xp;
			}
			++yp;
		}

		return blur / (blur_h * blur_v);
	}
| Notes: | The Flash player implementation works on sub-pixels and this algorithm does not. |
| The fact that this algorithm uses a square means it will generate visible artifacts in your image if you use a large value for the blur (i.e. more than about 7.) | |
| If you want this algorithm to work properly, make sure to save the results in a separate image so each pixel can be computed properly without the effect pre-applied. | |
| This algorithm does not show any clipping; if you want to keep it fast, you need to keep it that way and enlarge the source image making the edges a repeat of the edge color and the corners the corresponding corner color. |
The f_blur_horizontal and f_blur_vertical are expected to be larger than 1.0 to have an effect (usually at least 3, and in most cases 5 or more.)
The f_passes is a counter which should be at least 1. The blur effect will be repeated that many times on the image. When using 3, the resulting blur is close to a Gaussian Blur. Note that it will make the image bigger each time and applying this filter can be slow.
The convolution filter can be used to generate a really nice blur or avoid the vertical jitter of an animation on a CRT monitor. It is similar to the Blur filter, except that the computation of the destination pixels is fully controlled.
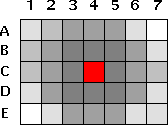
Fig 1 — Convolution Filter Example
The image above shows an example of a convolution filter. The red pixel is the one being tweaked. The different gray color represent the heavier (darker) weight and the lighter weights. The pixels drawn in white are ignored (i.e. their weights will be set to 0.)
The convolution filter can be described with the following C function:
	swf_rgba convolution(swf_rgba *source, int x, int y, swf_filter_convolution convolution)
	{
		swf_rgba	result;
		swf_rgba	pixel;
		int		i, j, p, q, pmax, qmax;

		result.reset();		/* black */
		pmax = convolution.f_rows / 2;
		qmax = convolution.f_columns / 2;
		for(j = 0, p = -pmax; p < pmax; ++p, ++j) {
			for(i = 0, q = -qmax; q < qmax; ++q, ++i) {
				pixel = source[x + p][y + q];
				pixel += convolution.f_bias;
				pixel *= convolution.f_weights[i][j];
				pixel /= convolution.f_divisor;
				result += pixel;
			}
		}

		return result;
	}
We can clearly see that a weight of 0 cancels that very pixel effect. We can notice also that the divisor is not necessary here (however, it may be possible to tweak the divisor using an ActionScript and in that case it can be useful.)
A blur algorithm can use a convolution filter with the following parameters:
{
  { 0.000, 0.050, 0.050, 0.050, 0.000 },
  { 0.050, 0.075, 0.075, 0.075, 0.050 },
  { 0.050, 0.075, 0.000, 0.075, 0.050 },
  { 0.050, 0.075, 0.075, 0.075, 0.050 },
  { 0.000, 0.050, 0.050, 0.050, 0.000 }
}
- Set f_columns to 5
- Set f_rows to 5
- Set f_divisor to 1
- Set f_bias to 0
- Set f_weights to:
- Set f_clamp to 1
- Set f_preserve_alpha to 1
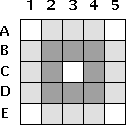
Fig 2 — Convolution filter to create a radian blur
When you want to remove most of the jitter on a television or any CRT monitor which use an interlace video mode, you can use the following setup:
- Set f_columns to 1
- Set f_rows to 3
- Set f_divisor to 1
- Set f_bias to 0
- Set f_weights to { 0.25, 0.5, 0.25 }
- Set f_default_color to black (0, 0, 0, 1)
- Set f_clamp to 0
- Set f_preserve_alpha to 1
![]()
Fig 3 — Convolution filter to limit interlace jitter
The f_columns and f_rows determine the size of the convolution filter.
The f_divisor divide the sum of the weighted pixel components. Note that you can incorporate the divisor in the weights. However, this is a mean to divide (or multiply) all the weights at once. Yet I suggest you put this parameter to 1 and change the weights instead.
The f_bias is added to the component of each pixel before they are multiplied by their corresponding factor.
The f_weights are used to determine how much of a given pixel color shall be used in the result.
The f_default_color color is used only if f_clamp is set to 0. This is the color to be used whenever it is necessary to compute the color of a pixel which is outside of the source.
f_clamp is used to determine the color to use whenever a pixel outside of the input image is necessary. When set to 1, the closest input pixel is used. When set to 0, the f_default_color is used.
If f_preserve_alpha is set to 1, then the source alpha channel is copied as is in the destination.
The color matrix is a 5x5 matrix used to tweak or adjust the colors of your objects. A full matrix can be used to change the contrast, brightness and color (just like you do on your television.)
The matrix is composed of 5 components of red, green, blue and alpha. The 5th row is not saved in the filter and is assume to always be [0 0 0 0 1].
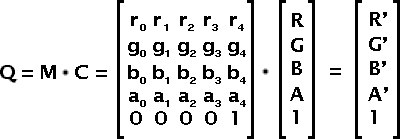
Fig 1 — Color Matrix Filter
The resulting color Q is computed as M · C, where C is a column matrix composed of the source pixel colors: red, green, blue, alpha and 1. The result is also a column matrix in which component 5 can be dropped.
Notice that f_matrix is composed of floats and not fixed point values.
In order to compute a color matrix from simple values, you want to use the following matrices and equations (see Appendix A. for more matrix computations.) Most of these equations are based on a paper written by Paul Haeberli in 1993.
Why is matrix computation on colors working so well? This is because the colors, when defined as (R, G, B) perfectly map to a 3 dimensional cube. The corner at (0, 0, 0) represents black, and the opposite corner at (1, 1, 1) represents white. The other corners represent Red, Green, Blue and their composites: Cyan, Yellow, Purple. Within the cube, all the usual 3D geometry computations apply to colors just the same as it applies to (x, y, z) vectors.
The following shows you have to modify the RGB components. The Alpha channel can in a similar way be modified. However, you usually do not want to change the alpha from the colors and thus it is likely that the only thing you will do with the alpha is a simple translation (change a0, a1, a2) and a scaling (change a3). By default, set the alpha row to [ 0 0 0 1 0 ] and the last column to [ 0 0 0 0 1 ].
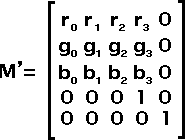
Fig 2 — Color Matrix with no effect on the alpha channel
In the following pretty much all the values are assumed to be defined between 0.0 and 1.0. Though there is no real limits, using larger values or negative values can have unexpected effects such as a clamping of one or more of the color components.
The Grey Vector is the vector going from (0, 0, 0) to (1, 1, 1). It represents all the grays from black to white. It is important since it is used to represent the luminance of the image.
Use the scaling matrix B to change the brightness. This has the effect of making the color vector longer or shorter, but it still points in the same direction. Some people call this the image Intensity.
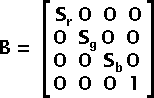
Fig 3 — Brightness Matrix B
In general, you want to set all scaling factors to the same value to change the brightness in a uniform way. By changing the scaling factors to different values you in effect change the color balance.
The luminance matrix L is used to determine how close your image is to the grey vector. The closer to the gray vector, the closer to a black and white image you will get. This is a saturation toward grey. The effect in the color cube is to move your color vector closer to the grey vector.
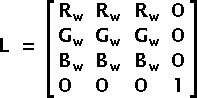
Fig 4 — Luminance Matrix (L)
The luminance matrix requires three weights (Rw, Gw, Bw) which are defined as (0.3086, 0.6094, 0.082). Note that the sum of these weights is 1.0.
The weights used here are linear. It is possible to use different weights for images which have different gammas. For instance, an NTSC image with a gamma of 2.2 has these weights: (0.299, 0.587, 0.114).
The saturation matrix S is used to saturate the colors. This matrix uses the weights defined for the Luminance matrix L. The effect in the color cube is to move your vector toward another vector. The Luminance is a special case which moves your vector toward the gray vector. And the identity matrix, which can also be considered a saturation matrix, is a special case which does not move your vector.

Fig 5 — Saturation Matrix (S)
The saturation parameter s shall be set to a value from -1 to 1. Note that a saturation of 1 generates an Identity Matrix and thus has no effect. A saturation of 0 generates a Luminance Matrix (s = 0 <=> S = L). A saturation of -1 generates a matrix which inverse all the colors of your image (negative).
Using the Brightness Matrix B and a translation matrix, it is possible to modify the contrast of your image by scaling the colors toward or away from the center (or some other point) of the color cube.
![]()
Fig 6 — Translation Matrix (T)
To apply a standard contrast c create a matrix Ts with offsets (0.5, 0.5, 0.5), a matrix Bc with the scaling factors set to c and compute the contrast matrix C as: C = -Ts · Bc · Ts
It is also possible to use a translation to change the colors of your image. This is not very useful since it is a simple addition (C' = C + T).
To change the hue of a color, it is necessary to rotate the color vector around the gray vector. It is easy to see that rotating the gray vector around itself generates itself. A gray hue cannot be changed. If you rotate the colors by 120°, red becomes green, green becomes blue and blue becomes red.
Note however that by only rotating the color, you generate a luminance error. This is because blue is not as bright as red or green and green is not as bright as red. To avoid the luminance loss, you need to apply a shear to make the luminance plane horizontal.
The following are all the steps used to rotate the Hue. Note that most matrices can be precomputed (in other words, you can very much optimize your code!)
Once you computed each of the matrices, you can merge them all together by multiplying them. The order should not matter except if you use a translation which isn't canceled (like the one for the contrast.)
M = B · S · C · H
Note that you do not need a Saturation and a Luminance since these are the same. However, you may still want to separate them for the sake of simplicity.
M = B · L · S · C · H
- Gray Vector
- Brightness (Matrix B)
- Luminance (Matrix L)
- Saturation (Matrix S)
- Contrast (Matrix C)
-
Hue (Matrix H)
Rotate the gray vector around the X axis by 45°. This places the the vector on the (x, y) plane.

Fig 7 — rotation around the X axisBecause we want to rotate by 45° the sine and cosine of the angle can directly be set to the inverse of the square root of 2.

Fig 8 — sine and cosine in the rotation around the X axisRotate the gray vector from the (x, y) plane to the positive Z direction. We want to rotate by about 35.2644°.
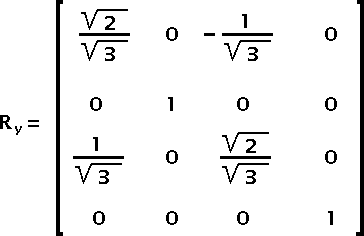
Fig 9 — rotation around the Y axisThe sine and cosine values of this equation can be computed with the square root of 2 and 3 as presented below:
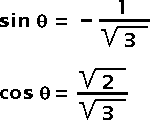
Fig 10 — sine and cosine in the rotation around the Y axisApply the Rx and Ry matrices to the luminance offsets, and use the result to compute the shear matrix.
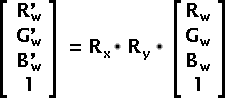
Fig 11 — How to compute the shear factorsThe Rw, Gw and Bw are the Luminance factors as defined for matrix L.
Now we can compute matrix K which is used for the luminance shear correction:
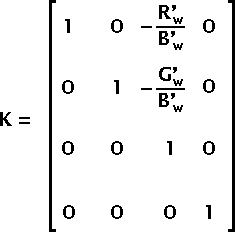
Fig 12 — Hue Shear Matrix KOnce you applied the Rx, Ry and K matrices to your color, you can safely rotate the result around the Z axis. This rotates the hue of the color. The rotation angle is expected to go from 0 to 2π.
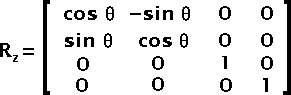
Fig 13 — Matrix to rotate the hueθ is set to the hue rotation angle.
Once you rotated your vector using Rz you need to put your vector back where it belongs. This is done by multiplying by the inverse of the K, Ry and Rx in that order. Note that since these matrices are quite simple, calculating their inverse is very easy.
K-1 is obtained by replacing B'w in the K matrix by –B'w.
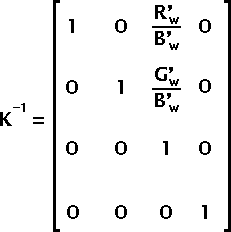
Fig 14 — Inverse of Matrix KRy-1 and Rx-1 are obtained by replacing the sine values by their opposite.
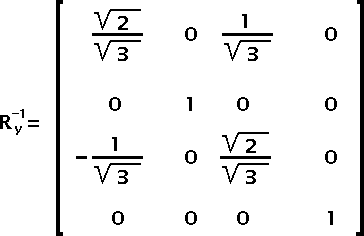
Fig 15 — Inverse of Matrix Ry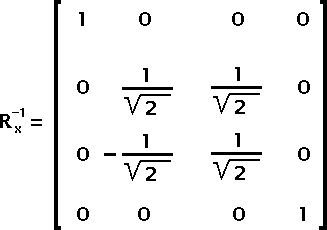
Fig 16 — Inverse of Matrix RxGiven the hue rotation angle θ you can write:
H = Rx · Ry · K · Rz · K-1 · Rx-1 · Ry-1
- X Rotation
- Y Rotation
- Luminance Shear (Matrix K)
- Hue rotation
- Remove the shear, y rotation and x rotation
- Final Hue Rotation Equation
- And finally the SWF Color Matrix
Filters Union
The any filter is simply a union of all the filters. Note that only one type of filter can be defined in an any filter and also the size will depend on that filter (it is not the largest size of all filters; plus, some filters use a dynamically determined size!)