Protected Node (The Drupal module —)
The Protected Node module is used on websites where some pages need to be password protected. This is different from asking someone to create an account and often seen as much more user friendly, although in terms of protection it is quite similar.
If you've seen photo websites where you can go to an album but have to enter a password to see the photos, that's one example how this module can be used.
The module adds a field set in the node form to let authors enter a password.
The module has many options that are rather tricky to use so this documentation tries to explain what you can do with the module. When combining the module with others, it is quite powerful, if you ask me!
Check out how you can minimize password hacking by robots with MO Anti-pounding.
Protected Node Installation
The basics of the Protected Node installation are easy:
- Get one of the tarball from Drupal.org
- Extract the files under sites/all/modules or some other modules folder
- Go to Administer » Site building » Modules and install the module (package Access)
- As the administrator (UID = 1) you are done.
Once you have installed the module, you probably want to change the permissions. Permissions allow your users to access the Protected Node functionality based on their roles. Please, see the point about Permissions for more information about those.
Now, you're ready to create a protected node. Either create a new node or edit one of your existing nodes and open the Password protect this page field set. In the field set, select on the This page is protected and enter a password (you have to enter the password twice to make sure you typed it right.) Hit Save. You've got a protected node now.
Either open another browser (not another tab!) or log out your account and go to that new page. The browser will be directed to a form asking you for the password. The content of this page can be tweaked (the text can be changed, cancel link, etc.) See the documentation about the Protected Node Form.
The module can also be used with quite advanced settings. For example, Anonymous users can be allowed to create a page with a password; combined with the node privacy by role module, you can prevent a set of users from access protected nodes and those allowed still have to use the password to see the content.
Protected Node Permissions
The Protected Node module adds permissions to define who has the right to make use of the password feature.
- access protected content
This is the basic access permission for users. Users who are given this permission can access a protected node as usual, except that they need to enter the password to handle the node.
This is true whether they want to view, edit, delete the node.
- bypass password protection
Users with the bypass permission can access all nodes that are protected without having to enter the passwords. This is very handy for website administrators and moderators.
- view protected content
At times, you want to use this module to protect the edit and delete functionality with a password, but not the view feature. This permission allows you to do so.
For example, you could let anonymous users create protected nodes with a password that only them know. That way, only the author and administrators can edit and delete the node. By giving anonymous users this permission, all the other users can see the content of the node, but cannot change it. (i.e. when they click the Edit button, they see the form asking them for the password.)
- edit any password (was "edit protected content"1)
Whether a user has the right to change the password of a node.
You can give your moderator the right to by pass the password, but not the right to change the password. That way, they cannot mess around with the node author password, however, they can still fix the node or delete it.
- edit <node type> password (was "edit protected <node type>")
You can allow password editing on a per node type basis.
The module also makes use of the usual node permissions to know whether a user can edit or delete a node. Therefore, the permission edit own story content is checked to know whether a user can edit the story content. If not, going to a node/#/edit for a password protected story node returns immediately with an access denied error2.
- 1. The term edit protected content was very misleading, hence my change. The fact is that this permission has nothing to do with whether a user has permission with editing a given node type. So when this flag is off, your users may still have permission to edit the node, they just won't be able to change the password settings of that node.
- 2. The old version of the module would not even ask for the password. Although if a user cannot edit, the result should be the same, but if the user needs to enter the password when viewing the node, one should be required to enter that same password when editing or deleting a node.
Protected Node Global Settings
The protected node module has global settings found under:
Administer » Site configuration » Protected node
Protected node Statistics
The page starts with statistics to let you know how pages are protected on your website. All the counts include published and unpublished content.
- Total nodes — the total number of nodes on your website
- Unprotected nodes — number of nodes that do not have a password
-
Protected nodes — number of nodes that are current protected by a password
- Showing title — number of nodes showing their title
- Hiding title — number of nodes hiding their title
- Global passwords — nodes that make use of the global password
- Node passwords — nodes that use their own password
Protected node security
The following field set includes security features. Any settings are secure, it is to allow you to tweak the security functions of the Protected node module to better match your needs.
Global password handling
The default is Per node password. This means the global password is not made available at all. Whether you enter a global password is not significant.
The Per node password or Global password option gives you the ability to protect nodes without having to enter a password each time. This is quite practical if you work with other moderators out of which a small group make use of specific password, and the rest can use the global password.
The Global password only selection entirely removes the need to enter a password on a per node basis. Obviously, this means that all the protected nodes make use of the exact same password. However, if you have a policy that requires you to frequently change the password, that could save your day.
NOTE
The global password is ignored, and the node password is required, if the author of the password is the anonymous user. This is important since many different people can be the anonymous user. In this special case the system always reacts as if this setting was Per node password.
IMPORTANT NOTES
It is important to note that the use of the Global Password is contradictory to using the password fork feature. The password fork expects a different password on each of the node you are trying to access.
Global password
Enter the global password twice if you make a selection that require a global password. Note that once you setup a password it cannot be removed from the interface. It will not be necessary to enter the password each time you change the settings.
This field makes use of the Drupal Core JavaScript functions to show you how safe the Global password is (weak, medium, strong, etc.)
Show password strength in nodes
By default the module only shows the regular two password fields in a node you are protecting. Both fields must include the same password to be able to save the node.
When this flag is turned on, the Protected node module adds the JavaScript code from Drupal Core that shows the users whether their password is weak, medium or strong.
This can cause some unwanted side effects (conflicts with other modules) so if you run into problems with this feature, turn it off.
Show node titles by default
When you protect a node, it is expected that the content of the node is secret but to those who know the password.
This flag gives permission to the Protected node module to display the title of the node (for example, with a photo album, it may be fine to show the name to the users so they know that they are trying to access the right album.)
IMPORTANT NOTES
The features in the next field set give you access to Tokens. These tokens can be used to include information about the node in the password form generated by the Protected node module. The tokens can be used to show the entire content of the node! Also, this flag does not prevent you from making use of the [node-title] token.
Protected node email support
I introduced a basic email functionality that will send the password to the people listed in the provided box.
Email node information
Enter the size of the text area used to enter the list of emails.
The size must be a width an X letter followed by the height.
For example: 60x5
Clear this field to remove the email functionality.
WARNING
Remember that spammers love to send emails from other people websites. Make sure to restrict access to this functionality so anonymous users or even the most basic registered users cannot send emails.
From email address
By default, the From: parameter is set to the content of the site mail variable.
This field let you enter a different email address (i.e. noreply@m2osw.com)
Email subject
Enter your own email subject. The system provides a default in case you don't enter your own. You may not like the default and it may not be translated.
Email content
The email body that supports tokens. The Protected node module provides a few tokens of its own. In this case, you may particularly interested by the [node-password] token.
Note that like the form, you can use any node token and show anything you want to your users. Be careful.
The list of available tokens is shown at the bottom of the Protected node form field set (i.e. next field set.)
Generate a random password if necessary
USE AT YOUR OWN RISK!
This option gives permission to the Protected node module to generate a password if you don't enter one when saving the node.
When this flag is off and emails are entered, the user is required to enter a password because the one in the database is encrypted. In other words, we could not send the password to the users listed in the node and the email is likely useless (unless you offer the view protected content permission.)
Protected node form
Whenever a user reaches a node that is protected by a password, one is sent to a form and asked for the top secret password.
That form includes a title, a main description, a field set with another description, the password field, and a submit button. This form can be tweaked as presented below.
Always add a cancel link
This flag can be selected to always show the users a Cancel link next to the Submit button. This is generally a good idea.
By default, the cancel link points back to where the user came from. This only works if the browser sent us a referrer URL when the user first tried to access the protected content. Obviously, if you gave a direct link for your users to enter in their browser, there will be no referrer. Also, many browsers don't give away foreign websites (i.e. if you click on a link on another website that points to one of your pages, then it is likely that your browser will not tell you anything about that foreign website.)
When no referrer was defined, the Cancel link points to your front page.
Password page title
The title of the page. It supports tokens (i.e. [node-title]).
Password page general information
This description appears right before the password field set. It may be made empty to remove the field.
Password page description (inside the field set)
This description appears inside the password field set, right before the two password text fields.
Password field label on password page
This is the label appearing before the two passwords. It is not possible to change the other two fields (Password & Confirm password).
Protected node actions
Mass actions on nodes in regard to the protected node features. This should be extended to include functions in the Content page, but for now, it's here and always acts on all nodes or a subset defined by the protected flag or existing passwords.
The sub-field sets are there to prevent you from clicking on the wrong button too often. Remember that since these functions are applied against all the nodes of your website, if you don't have a backup, you may lose valuable information.
Clear sessions
This version of the module let you clear all the sessions.
NOTES
The function really just saves the current date as the deadline date used to know whether a password was entered a long time ago. For this reason, you will notice that this is extremely fast, even on very large websites.
Reset passwords
When you create nodes making use of the Global password and at some point want to remove the Global password functionality. This mass reset passwords is very useful in this case. It sets a node password to all the nodes that were using the Global password.
Note that this function doesn't touch the existing passwords, it only sets passwords where missing.
Use global password
This function resets all the passwords to make use of the global password. This is useful if you change your mind and decide that all your protected nodes should use the Global password.
Note that to change all the passwords of all your protected nodes, you may first clear them with this action, and then use the Reset passwords action to set the password on all protected nodes. It is one way to change the password on all your nodes, but it's a bit drastic!
WARNING
This erase all the existing passwords. Be very careful when using this action.
Remove protection
This function clears the This <node-type> is protected flag from all your nodes.
This means no more nodes will then be protected. Be very careful with this function!
Protect nodes
This function transform your entire website in a protected website. All your nodes will require a password to access them.
Note that special pages (non-nodes) are not currently protected by this module. For example, your contact page, views, PAD file pages, etc. remain publicly accessible.
This action requires you to create a Global password. However, the system will not generate an error if you did not turn on the Global password functionality. It is your responsibility. Without turning on the Global password, all your nodes will be inaccessible since no password can be matched.
Restore protection
If somehow some of your nodes with a password got unprotected, this function can be used to re-protect them.
In a way, this is similar to Protect nodes, but it is limited to nodes that had a password. This means it will not protect nodes that were protected with the Global password.
Note that nodes that have a node type set to Never protected will still not be protected whether they had a password defined or not.
Protected Node Password Field set
Once installed and properly configured, the Protected node module adds a field set in the node edit form (assuming the user has the corresponding permission: "edit any password" or "edit password <node type>".)
 This field set includes two flags, a password, and emails (optional.)
By default, the field set is closed unless you selected protected by default. Whether the field set should be opened or closed can selected in the node type settings.
The <node type> is protected
The first check box is used to password protect the node. When checked, the password is required for people who have permission to access the node, but cannot bypass the password in some way (i.e. view, bypass or UID=1 permission.)
Note that this flag is not shown if the node type is marked as Always protected. In that case, it is assumed to always be selected and therefore there is no point to give the user the choice.
Show title
The second check box defines whether the default forms have permission to show the title of the node. This is also used to show or hide the title from other modules (such as the Views). This may not work in all cases (i.e when you include tokens.)
Password
The two passwords are shown except when the Global password only option is selected in the global settings of the module. The passwords are required unless you accept a Global password. If required, the node cannot be saved until entered.
The global settings can be used to select whether the JavaScript password strength display should be shown or not.
Emails
By default, no email field appears. When you select that option in the global settings, you also get a text area where you can enter any number of email addresses1 that should be notified about the page and password.
Node password
Note that when you enter one or more email addresses, it is required to enter the password2. This is because to send the password in clear in the email, you have to re-enter it (the module saves the password encrypted in the database.)
Random node password
Note that instead of entering a password yourself, you can ask the module to generate a password for you (see the global settings.) In this case, I suggest you enter your own email address if you want to know what the password ends up being.
Global password
When you are using the Global password facility, the password cannot be sent using the [node-password] token. Instead, you have to enter the password in the email in the Global settings which means it will be saved in clear in the database.
WARNING
Remember that in most cases emails are sent unencrypted (i.e. totally clear text.) This module does not offer encryption support and thus the password will be sent in clear text. Use at your own risk!
- 1. The number of emails is limited by the power of your server. At this time the module does not prevent one from pasting thousands of email addresses, although it is very likely that the PHP script will be stopped before all the emails are sent. 10 or less should work without a problem.
- 2. The module will actually detect whether the password is necessary for the email. If not, then it won't be required, but since it is likely there, I say that it is required.
Protected Node per Node Type Settings
Node Type extension
The Protected Node module adds a field set to the Node Type form that you edit under:
Administer » Content management » Content types
These additions are explained in detail below.
The main reason for adding this feature is to avoid seeing the field set on all the node edit forms. With this feature you can hide the form on all the node types that you will never protect with a password.
Protected mode for nodes of this type
This option let you choose how this node type handles the Protected Node capability.
Never protected
This means this node type is never protected by Protected Node. This doesn't mean other modules cannot protect the node in some other way, of course.
The protection, if any, of existing nodes is ignored, but not removed. In other words, reverting to the default selection restores the initial protection status.
Use this with caution if you already have protected nodes (you can find out which are protected by creating a view.)
Protectable (default is unprotected)
This is the default selection for all your node types.
This means, if unchanged, nodes are marked not protected when created. Authors with permissions can protect the node if they want to do so.
Protectable (default is protected)
This setting is similar to the previous one, except that any new node is created protected by default (instead of unprotected.)
This is quite handy if you have a node type that in most cases requires protection.
Always protected
This is the opposite of Never protected. Such nodes will be protected, no matter what. This means the password field becomes required if no global password applies.
Also, when going to the node, whether it has a valid password or not, one will be queried for. So in effect, such nodes without a password are only accessible by the author and administrators.
A default (global) password for nodes of this type
It is possible to setup this node type with a global password. This means any one node without its own password will make use of this node type global password, when defined.
This means you can now define one global password per node type, plus one master password (global to the entire website) in the global settings of the Protected Node module.
Because this feature requires an extra database access, the system really checks the password in this order:
- Node specific password
- The Protected Node global settings password
- The node type default (global) password
That way we avoid a database access if the password is the node specific password or the global settings password. There should be no reason for this order to affect the results of this test.
The settings make use of the JavaScript password check so the administrator is told if the password is not strong.
How to show the protected node fieldset
When editing a node and you have the right to change the protected node settings, the module inserts a field set with the "Protected Node" flag, a password field, and a title checkbox. It may also include a text field to enter email addresses used to email the password to other users.
That field set can be shown closed or opened depending on this selection:
- Always open
- Smart mode (Open when protected)
- Always closed
Always open and Always closed are self explanatory.
The default, Smart mode, behaves in the same way the Menu field set behaves when editing a node. That means it is generally closed by default and if the node is protected by the user, the next edits show the field set opened to clearly show that it is already protected.
Note that Smart mode is similar to Always open when the node type is always protected.
It is also possible that the field set is not even shown. This happens when the user does not have permission to change the password and/or when the node type uses Never Protected.
Protected Node Password Form
Protected Node Password Form
 Once a node is protected, users who cannot bypass the password are sent to the password form (see image on the side.)
The password form is very simple. It includes one field for users to enter the node password and an OK button.
When the browser of the user sent us a referrer, then the Protected node module adds a Cancel link back to that referrer. Using the global settings, you can force a Cancel link to always be there. When no referrer is available, the Cancel link will send your users to your home page.
The title, information, description and title over the password are all changeable in the global settings of the Protected node module.
Advanced Usage of the Protected Node Password Form
Note that you may generate a link directly to a password page. These pages use the path /protected-node and support the following query strings:
- destination=<path> (required)
The <path> to the page being unprotected. It is smart to not lie about which page is being unlocked since otherwise the user will be asked for a password again (assuming that destination require a password.)
The <path> must be a path on your website. Yet, you can define a redirect on that path meaning that you can still send people on another website if they know the password. Probably not a real protection though, but a possible usage of this form.
- protected_page=<nid> (required)
The node identifier of the node specified in the destination <path>.
Again the system does not verify that the <nid> and <path> match. It is your responsibility to make sure that they do. Either way, it should work, but could be disturbing to your end users.
- back=<url>
When a referrer is defined, it is saved in the back parameter. This <url> may point to another website altogether.
By default, when back is undefined, the module does not include a Cancel link.
Protected Node Password Fork Feature
Password Fork
The new module allows for a password fork.
This means you can send your users to one specific page, and tell them about a password to use on that one page. Depending on the password, they will be sent to one of several nodes.
This works in a very similar way as the other password form, except that there is no specific destination, and the users need to know any one of the passwords.
The feature uses a specific URL defined as follow:
/protected-nodes?protected_pages=<nid1>,<nid2>,...&back=<url>
- protected_pages=<nid1>,<nid2>,...
This parameter is set to 2 or more node identifiers. All the nodes should be protected nodes.
In case you defined node tokens in the different form messages defined in the global settings of the module, the information from the very first node (<nid1>) will be used.
- back=<url>
The back parameter is used in exactly the same way as the regular password form. It is the URL used by the Cancel link and if the not set but the Cancel link is always added, then the <front> page is used.
NOTE
If the destination parameter is defined, the module generates an access denied error.
Known issues
Clearing Sessions
As with single nodes, a user returning once one entered a password that successfully unlocked a page will directly be sent to that page instead of being asked for the password.
In most cases this is great since that way the user doesn't need to re-enter the password over and over again. However, a user who enters the password he knows, then purchases a better version and tries to go back to enter the new password he just purchased... will find himself on the old page without being given a chance to enter the new password.
At this time, I'm not too sure how to fix the problem, except by adding an action in the Rules module and letting you use that action whenever the user purchase a new password.
Global Password
All the nodes specified in the list of nodes to the protected_pages parameter cannot be using the global password. The test to such nodes will always fail. This cannot be fixed since if more than one such node was to be specified, only the first one could be accessed.
However, since you can enter any password in the node, you can very well duplicate the global password in one of the nodes.
Protected Node Views Support
The Protected Nodes offers some additional supports to views 2.x and 3.x in Drupal 6.x.
The additional support includes fields, filters, and sort capabilities that are added to the Node type. The join between the regular node and the protected node data is the node identifier (nid). This means the revision identifier is ignored.
-
Password last changed
This value is the date when the password was last modified. You can display this date, filter using the date, and sort by date.
-
Node is protected
This value is a yes/no value (i.e. Boolean) which can be displayed, used to filter protected or non-protected nodes, or to sort nodes (protected node first or last.)
-
Protected node, but show title
This value is a yes/no value (i.e. Boolean) which defines whether the title of the node is public (yes) or also private (no.) The value can be displayed, used to filter nodes, or to sort nodes.
Protected Node Rules Support
The following features are available only when installing the Rules extension of protected nodes. This extension requires the thrid party Rules extension for Drupal.
Protected Node Rules Conditions
When handling a Node, it is possible to check whether the node is currently protected or locked.
Protected Nodes
A node is said protected when the node was protected by a password using the Protected node module.
Whether the user can view that node is irrevelant in this case. Only the fact that the node requires a password to be viewed is what this condition checks.
Locked Nodes
A node is said to be locked if the current user needs to enter a password before being able to visualize the node.
Note: at this point you cannot test whether the node is locked for someone else than the current user (global $user).
Protected Node Rules Actions
Protect Node
Mark a node as protected. The password is not changed in any way. For this to work as expected, you certainly want to make use of a form of global password (global to your entire site or to a node type.)
If no global password is defined, then the node becomes locked away from everyone except the few who have access to all protected nodes (See permissions for more information.)
Password protect node
Mark a node as protected and assign the specified password.
This action will protect as many nodes as you want, but all will be assigned the exact same password as defined in the action.
Unprotect the node
Mark the node as unprotected. Anyone can see the node afterward.
Lock the node away from current user
This action clears the session of the current user which in effect marks the node as locked again. This means the user will be required to re-enter the password to access the node again.
Note that this feature only works with the current user session. At this point you cannot delete the session of user A when user B is visiting your site.
Unlock the node for current user
This action adds a session for the current user offering the user access to the corresponding node without having to enter a password.
This can be useful to temporarily unlock a node only after a user visited a specific page on your website. If they don't first visit that page, going to the node would require a password which, if they don't have it, would ask them to enter the password or give them an access denied error.
Example of usage as a Logout feature
I was asked about a way to let users log out of a node where they went and had to enter a password. The problem is that if you're on a public computer, now the session cookie is saved on that computer and unless the user knows how to delete cookies, anyone who has access to that computer can find that protected node.
To palliate to that problem, we can add a Logout link on protected pages that send the user to a Thank You page, when a user arrives on that Thank You page1, the Rules module can detect it.
There an example link that will work for you. Notice the nocache=1 parameter, this is to prevent the system or boost caching features so the log out page always reacts (otherwise the .html version would be returned and the rules never executed!)
<p><a href="/logout-locked-page?nocache=1"
      title="Log out of this page.">Log Out</a> from this page.</p>
You may also want to add the path of the file in the boost field used to this effect:

The following assumes that you installed the Protected Node rules extension module. Without it, you won't be able to change locks. Create a new Triggered rule.
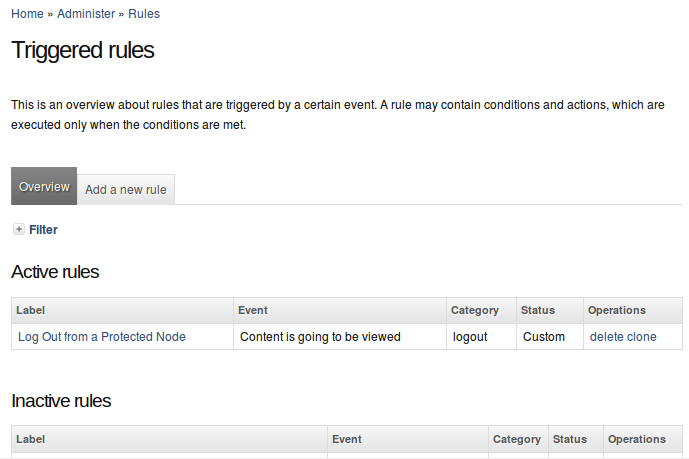
The rule makes use of the trigger (event) named Content is going to be viewed. Don't forget to enter a label. This should be something like "logout page name".
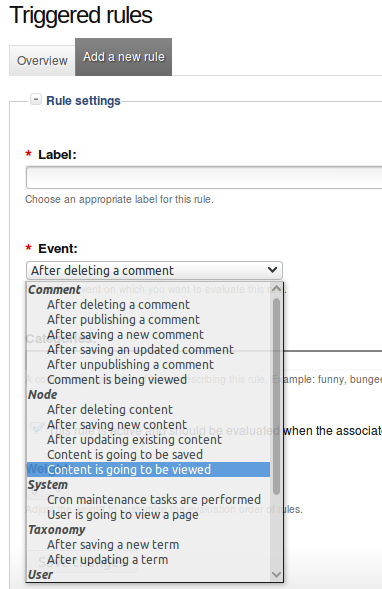
You are likely to want a condition since without it any page (node) being viewed will react to the event and lock the user out (which means the user can never see the page.) A simple condition is to compare the node identifier (nid). This can be done with the compare numbers condition.
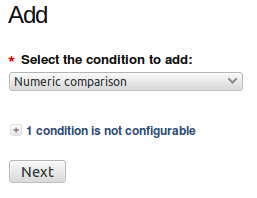
The condition makes use of a token (you have to have the Token module installed with this method!) with Can't find nid to include! as one of the numbers. That way you can make sure that the user is about to view your Log Out page. Note that you could also make use of a specific node type, you could send the user to the front page and detect that event, detect that the node has a specific term... the list is not limited to using the number comparison and other methods do not all require the use of the token module.
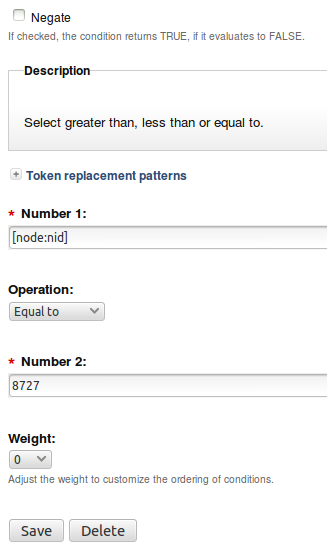
A simple way to see the number of a node, in case you have clean URLs with the automatic URL path aliases is to edit the page. Then the URI includes the number: node/###/edit. Make sure to enter that number in Number 2 of that condition form.
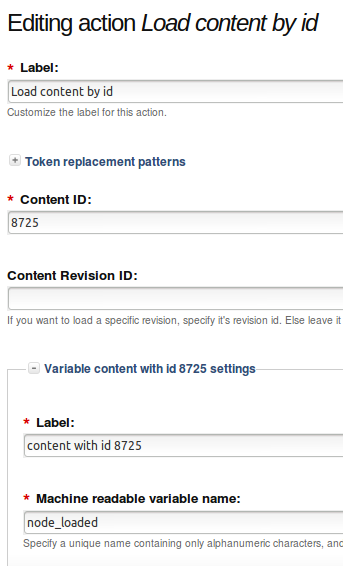
At this point we know that we are on the log out page. We want to load the node that is currently unlocked so we can lock it. This is done with a Load content by id action or similar. Change the Content ID with the node identifier of the node that needs to be locked.
Now, in the set of actions include the Lock the node away from the current user action and give it a weight of 1 so the load always happens first. Note that the lock needs to happen on the unprotected node, so your rule has to load that node first (since the Thank You page would be another node,) then apply the action on that node and that is done by selecting the node in the drop down.
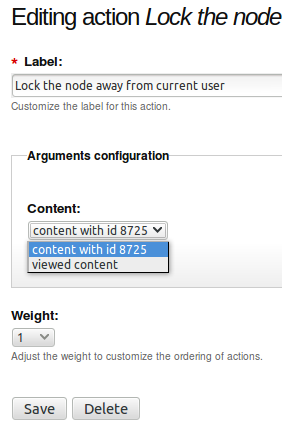
Note that your actions can include as many Load node and Lock the node away from current user... as you need. So the same Thank You page can be reused to lock many different nodes.
- 1. Create a new rule with Content is going to be viewed as the trigger.