Appendix A — The geometry in SWF
This appendix describes different aspects of the geometry in Flash. Note that some of the description uses 3D matrices. It is rather easy to simplify them and use just and only 2D matrices. The simplifications can usually be such that only 2 or 3 operations are required to get the proper coordinates used to render objects.
Remember that Flash uses TWIPs and thus you certainly will want to use floating points to make it easy on you.
Appendix A — The geometry in SWF — Coordinates
The most common and simple geometric information are the object coordinates on the output screen. These are defined in TWIPs. There are 20 twips per pixels. Note that an embedded SWF file can be enlarged and/or reduced thus changing this basic scaling factor. To have exactly 20 twips per pixel you must ensure that the EMBED and/or OBJECT tags use a WIDTH and HEIGHT with exactly the same value as in the rectangle defined in the SWF header file divided by 20. The coordinates are defined from the top-left of the screen area to the bottom-right (x increases from the left to the right as expected; y increases from top to bottom as on most graphical devices on computers). The following shows you the coordinates system.
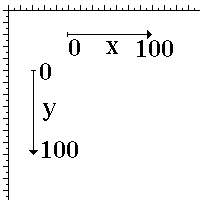
Fig 1. Coordinates
Because one can use scaling and translations, the coordinates can easilly be inverted to have the y coordinates grow from bottom to top. However, to create your own player or generate proper SWF files, you need to know how the raw coordinates system works.
There are limits to everything including coordinates. In order to enable all sorts of objects to be drawn, one should look at the result in a pixel environment (ie. as it will be drawn on the final screen). The idea of using TWIPs is to enable some interested people to zoom in (up to 20 times!) and still keep a high quality (this isn't true for images though).
Appendix A — The geometry in SWF — Edges
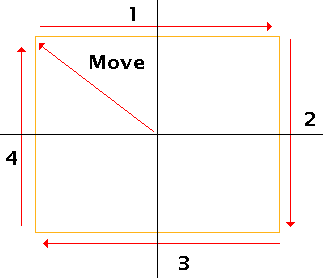
Edges are used to define a shape vector based and also coordinates where images need to be drawn. The edges are always coordinates from where ever your last point was to where ever you want the next point to be (a little like a turtle in LOGO).
For vector based shapes to be placed anywhere in the screen and easily transformed with matrices, you should always create them centered properly (i.e. the center of the shape should be placed wherever you think it is the most appropriate in order to enable easy rotations - i.e. in a circle, the center of the circle should be selected and in a square the center of that square).
The fill styles and line styles can all be used together. The line style is fairly easy to understand. There is a width in TWIPS and a color. When a filled shape is being drawn using a line style it is used to draw the borders of the shape. There can be one or two fill styles. They both are drawn one after another wherever an area has to be filled. The filling scheme is a very simple even-odd scheme (i.e. don't draw till first line being crossed, then draw till next line, then don't draw till next line, etc.)

Fig 1. Edges
The edges are defined either as a straight line record (a set of (x, y) coordinates) or a curve record (two sets of (x, y) coordinates). These coordinates are not absolute. Instead these are added to the previous coordinates. This usually enables for much better compression since these numbers are always very small.
The encoding even enables the definition of straight lines with the use of only the x or y offset for straight lines. Thus, if you create a square, with coordinates (-10,-10) and (+10,+10) you would define it as follow in SWF:
 |
|
|
| Fig 2. Edges |
The curves are simple B-splines defined by only three points (see Edges - Fig 3.):
- the starting point defined as the current position;
- the edge control point; it is the point which has an effect on the shape of the curve;
- and the anchor point which is the ending point of the curve;
Curves perfectly go through the starting and ending points which can therefore be perfectly continued by a straight line or another curve.
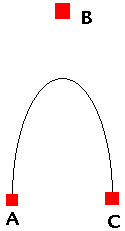
Fig 3. Edges
A curve is defined as six curve segments Q3 to Q8. These are defined by duplicating the starting and ending points four times each giving a set of points similar to [A, A, A, A, B, C, C, C, C]. Edges - Fig. 4 shows the computation used to define each segment (i varying from 3 to 8). The parameter u can be given values from 0 to 1. The number of values will depend on the precision you need to draw the resulting curve.
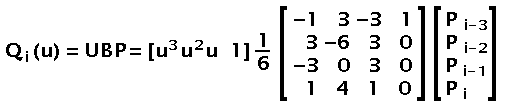
Fig 4. Edges
Though the math can be simplified in the case of SWF (since we only have three points), the following shows you a simple C code that can be used to draw such a curve (this is a cubic spline rendering.)
struct point {
	double		x;
	double		y;
};

const double	Bmatrix[4][4] = {
	{ -1,  3, -3, 1 },
	{  3, -6,  3, 0 },
	{ -3,  0,  3, 0 },
	{  1,  4,  1, 0 }
};

void compute_point(double u, const struct point *input_points, struct point *result_point)
{
	double		Umatrix[4], Pmatrix[4][4], Imatrix[4], Rmatrix[4];

	/* compute the U factors */
	Umatrix[0] = u * u * u;
	Umatrix[1] = u * u;
	Umatrix[2] = u;
	Umatrix[3] = 1;

	/* because there is no Z it is set to zero */
	Pmatrix[0][0] = input_points[0].x;
	Pmatrix[0][1] = input_points[0].y;
	Pmatrix[0][2] = 0;
	Pmatrix[0][3] = 1;
	Pmatrix[1][0] = input_points[1].x;
	Pmatrix[1][1] = input_points[1].y;
	Pmatrix[1][2] = 0;
	Pmatrix[1][3] = 1;
	Pmatrix[2][0] = input_points[2].x;
	Pmatrix[2][1] = input_points[2].y;
	Pmatrix[2][2] = 0;
	Pmatrix[2][3] = 1;
	Pmatrix[3][0] = input_points[3].x;
	Pmatrix[3][1] = input_points[3].y;
	Pmatrix[3][2] = 0;
	Pmatrix[3][3] = 1;

	/* compute I = UB */
	Imatrix[0] =    Umatrix[0] * Bmatrix[0][0] +
			Umatrix[1] * Bmatrix[1][0] +
			Umatrix[2] * Bmatrix[2][0] +
			Umatrix[3] * Bmatrix[3][0];

	Imatrix[1] =    Umatrix[0] * Bmatrix[0][1] +
			Umatrix[1] * Bmatrix[1][1] +
			Umatrix[2] * Bmatrix[2][1] +
			Umatrix[3] * Bmatrix[3][1];

	Imatrix[2] =    Umatrix[0] * Bmatrix[0][2] +
			Umatrix[1] * Bmatrix[1][2] +
			Umatrix[2] * Bmatrix[2][2] +
			Umatrix[3] * Bmatrix[3][2];

	Imatrix[3] =    Umatrix[0] * Bmatrix[0][3] +
			Umatrix[1] * Bmatrix[1][3] +
			Umatrix[2] * Bmatrix[2][3] +
			Umatrix[3] * Bmatrix[3][3];

	/* I = I x 1/6 */
	Imatrix[0] /= 6.0;
	Imatrix[1] /= 6.0;
	Imatrix[2] /= 6.0;
	Imatrix[3] /= 6.0;

	/* R = IP */
	Rmatrix[0] =    Imatrix[0] * Pmatrix[0][0] +
			Imatrix[1] * Pmatrix[1][0] +
			Imatrix[2] * Pmatrix[2][0] +
			Imatrix[3] * Pmatrix[3][0];

	Rmatrix[1] =    Imatrix[0] * Pmatrix[0][1] +
			Imatrix[1] * Pmatrix[1][1] +
			Imatrix[2] * Pmatrix[2][1] +
			Imatrix[3] * Pmatrix[3][1];

	Rmatrix[2] =    Imatrix[0] * Pmatrix[0][2] +
			Imatrix[1] * Pmatrix[1][2] +
			Imatrix[2] * Pmatrix[2][2] +
			Imatrix[3] * Pmatrix[3][2];

	Rmatrix[3] =    Imatrix[0] * Pmatrix[0][3] +
			Imatrix[1] * Pmatrix[1][3] +
			Imatrix[2] * Pmatrix[2][3] +
			Imatrix[3] * Pmatrix[3][3];

	/* copy the result in user supplied result point */
	result_point[0].x = Rmatrix[0];
	result_point[0].y = Rmatrix[1];
}


void compute_curve(long repeat, const struct point *input_points, struct point *result_points)
{
	/* we assume that the input_points are the three points of interest
	   (namely: start, control and end) */
	/* we assume that the result_points is a large enough array to receive
	   the resulting points (depends on the repeat parameter) */
	struct point		*points[9];
	int			p, i;
	double			u;

	/* transform so compute_point() can easilly be used */
	points[0] = input_points[0];
	points[1] = input_points[0];
	points[2] = input_points[0];
	points[3] = input_points[0];
	points[4] = input_points[1];
	points[5] = input_points[2];
	points[6] = input_points[2];
	points[7] = input_points[2];
	points[8] = input_points[2];

	/* we could have a way to define the very first and last points without
	   calling the sub-function since these are equal to the input_points[0] and
	   input_points[2] respectively */
	for(p = 0, i = 0; i <= 5; i++) {
		for(u = 0.0; u < 1.0; u += 1.0 / repeat, p++) {
			compute_point(u, points + i, result_points + p);
		}
	}
}
Any good C programmer will see many possible simplifications in the compute_point code. The two main simplifications are the Rmatrix[2] and Rmatrix[3] which are not required (and therefore don't need to be computed). The division by 6 could be applied to the B matrix. Umatrix[3] being 1.0, it could be ignored in the computations. etc.
With 3 points, you can also use the following code that is a quadratic spline computation with only (x, y) coordinates.
struct point {
        float x;
        float y;
};

point cp[3];
point *rp;

... // initialize the 3 points of an SWF curve

int LOD = 10; // number of segments per spline
for(int i = 0; i < LOD; i++, rp++) {
	float t = (float) i / (float) LOD;
	float it = 1.0f - t;

	// calculate blending factors
	float b0 = it * it;
	float b1 = 2 * it * t;
	float b2 = t * t;

	// calculate curve point
	rp->x = b0 * cp[0].x + b1 * cp[1].x + b2 * cp[2].x;
	rp->y = b0 * cp[0].y + b1 * cp[1].y + b2 * cp[2].y;
}
Appendix A — The geometry in SWF — Gradient Fills
It is possible in SWF to use gradient fills. The gradient definitions are pretty raw and require you to draw large objects (that you can scale down later if you wish). A radial fill will usually be used to draw a round corner or a big & smooth dot. A linear fill can be used to draw objects which go from one color to another. The linear fill goes from left to right by default. It can be rotation as required though. Yet, in either case what is drawn in the shape object needs to be at the right scale and in the right direction. This may not always prove easy to deal with!
There are some additional technical information with the description of the gradient records.
Appendix A — The geometry in SWF — Images
When appropriate, images can also be included in SWF files. All the images can be full color and also have an alpha channel.
In order to draw an image on the screen, it is necessary to use a fill style and a shape. Thus, you need at least three tags: DefineBitsLossless or DefineBitsJPEG, a DefineShape and a PlaceObject in order to draw an image on the screen. The fill style of the shape needs to include a matrix with a scale of 20x20 in order to draw the image at the original sizes. Also the rectangle used to draw around the image will use 20 TWIPS per pixels of the image. Like with other shapes, if it is necessary to rotate the image by the center, then the shape will have to be defined with a MOVE to (width / -2.0, height / -2.0) and the image rectangle drawn around the center. With edges, this means a set of positions such as:
- Move to (width/-2, height/-2)
- +(width, 0)
- +(0, height)
- +(-width, 0)
- +(0, -height)
If you want to draw the image only once, you should make sure that the fill is of type clipped. A tilled image could be drawn multiple times.
There is an example of a 640x480 image:
Tag: DefineBitsLossless
Object ID: 1
Format: 5 (32 bits ARGB)
Bitmap sizes: 640x480
Tag: DefineShape
Object ID: 2
Rectangle: (0, 0) - (12800, 9600)
Fill Style #1:
Clipped Bitmap, ID: 1
Matrix:
Scale 20x20
Translate: (-6400, -4800)
Edges:
Move (-6400, -4800)
Use fill #1
Delta (12800, 0)
Delta (0, 9600)
Delta (-12800, 0)
Delta (0, -9600)
Tag: PlaceObject
Place Object: #2
Depth: 1
Matrix:
Translate: (6400, 4800)
Note that it is possible that one pixel will be missing using such values. It isn't rare to add 20 to the Edges deltas in order to include the missing pixel (this is mainly due to the computation of the anti-aliasing effect).
Appendix A — The geometry in SWF — Matrix
The coordinates are often transformed with the use of a matrix. The matrix is similar to a transformation matrix in Postscript. It includes a set of scaling factors, rotation angles and translations.
When only the scaling factors are used (no rotation) then these are ratios as one would expect. If a rotation is also applied, then the scaling ratios will be affected accordingly.
The translations are in TWIPS like any coordinates and also they are applied last (thus, it represents the position at which the shape is drawn on the output screen).
The math formula is as simple as: Q = MP + T. Q is the resulting point, P is the source point, M is the scaling and rotation factors and T is the final translation.
With the use of a three dimensional set of matrices, one can compute a single matrix which includes all the transformations.
|
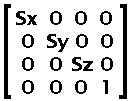
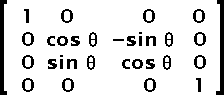
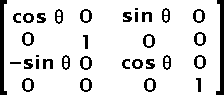
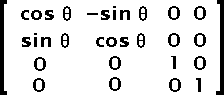
Thus, the matrix saved in the SWF file is the product of the matrix in figure 2 and the matrix in figure 5.

Fig 6. Matrix
A matrix multiplication is the sum of the products of rows (left matrix) and columns (right matrix).
	m11 = s11 * r11 + s12 * r21 + s13 * r31 + s14 * r41

	m12 = s21 * r11 + s22 * r21 + s23 * r31 + s24 * r41

	m13 = s31 * r11 + s32 * r21 + s33 * r31 + s34 * r41

	m14 = s41 * r11 + s42 * r21 + s43 * r31 + s44 * r41

	m21 = s11 * r12 + s12 * r22 + s13 * r32 + s14 * r42

	m22 = s21 * r12 + s22 * r22 + s23 * r32 + s24 * r42

	m23 = s31 * r12 + s32 * r22 + s33 * r32 + s34 * r42

	m24 = s41 * r12 + s42 * r22 + s43 * r32 + s44 * r42

	m31 = s11 * r13 + s12 * r23 + s13 * r33 + s14 * r43

	m32 = s21 * r13 + s22 * r23 + s23 * r33 + s24 * r43

	m33 = s31 * r13 + s32 * r23 + s33 * r33 + s34 * r43

	m34 = s41 * r13 + s42 * r23 + s43 * r33 + s44 * r43

	m41 = s11 * r14 + s12 * r24 + s13 * r34 + s14 * r44

	m42 = s21 * r14 + s22 * r24 + s23 * r34 + s24 * r44

	m43 = s31 * r14 + s32 * r24 + s33 * r34 + s34 * r44

	m44 = s41 * r14 + s42 * r24 + s43 * r34 + s44 * r44
Though you shouldn't need to find the scaling factors and rotation angle from an SWF matrix, it is possible to find one if you know the other. This is done using a multiplication of either the inverse scaling (use: 1/Sx and 1/Sy instead of Sx and Sy for the scaling matrix) or the inverse rotation (use: -angle instead of angle in the Z rotation matrix).
For those who still wonder what I'm talking about, there are the four computations you need from a scaling factor and an angle in radiant:
	SWFmatrix11 =  Sx * cos(angle)
	SWFmatrix12 =  Sy * sin(angle)
	SWFmatrix21 = -Sx * sin(angle)
	SWFmatrix22 =  Sy * cos(angle)
SWFmatrix11 and SWFmatrix22 are saved in the (x, y) scale respectively and the SWFmatrix21 and SWFmatrix12 are the rotation skew0 and skew1 values respectively.